Saturday, March 31, 2012

Paint and Aggravation

I hope I'm not alone.  I just finished a new piece and started to prep the pictures for the blog.  What pictures?   You mean I never took "before" shots?  And I never took "during" shots??  ARRG!


So, today I only have "after" shots.  And they're not especially great.


Anyway, I bought this cute little table from another vendor in my mall.  I originally thought I'd paint the center in blackboard paint.  But I changed my mind.  I was inspired by some of the pieces done by Rosemary at Villabarnes.   So I gave it two coats of Paris Gray, then dry brushed it in Old White.  


I grabbed a great French graphic from Karen at The Graphics Fairy and used the freezer paper method for transferring the image.  You can read about that here.  


The freezer paper method was new to me.  I've done a few other image transfers using carbon paper.  (You can see those here).  I had a couple of spots that were too wet and the image blurred.  A little touch up with some paint and a sharpie did the trick.  I love the way it turned out.

I think it's worth the aggravation!

Pin It
My entry into Creative Me is sponsored by Appliances Online and Bosch Washing Machines
I'm linking up to these great parties this week:


PhotobucketHow to Nest for LessThree Mango Seeds
DelectableHomeHome Stories A2Z
HOGHookingupwithHoHThe 36th AVENUE
PhotobucketThe Shabby NestFurniture Feature Fridays
http://www.findingfabulousblog.com/Decorating InsanityPhotobucketThe Graphics Fairy
beneath my heartThe Southern Institute

Monday, March 26, 2012

Oooo, La La!

The long winter wait is over!  We've had beautiful weather this week and I've finally been able to get some paining done!

I had this china cabinet in the shop for almost a year.  I intended to paint it before I took it in, but I sold some things and had a hole... so to the shop it went - naked!


Why did I bother?  It didn't sell.  So, I hauled it back home determined to paint it and turn it into fabulous!

I'm loving everything French, so I began with two coats of ASCP Paris Gray.

Then I hand-painted all the trim Old White.  (Before on the left, after on the right).  It looked awesome, but it looked new.  So I added a coat of clear wax and then a coat of dark wax.  

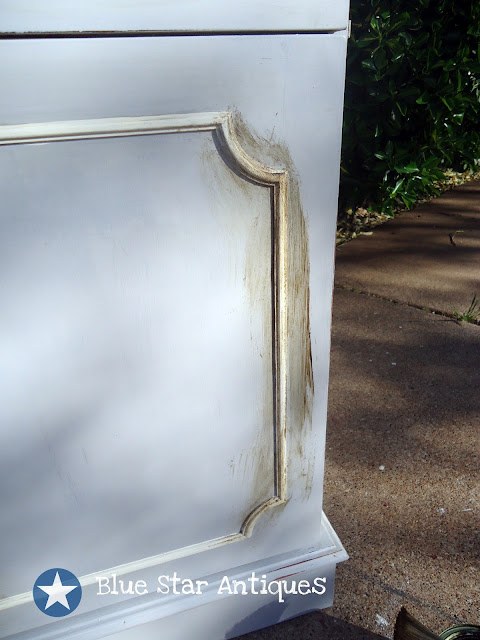
Dark wax has been a challenge for me to master, so here's what I learned on this project.  I brushed on some dark wax.  Ugly, right?

Then I wiped the excess off.  You can see how it's lighter, but not pretty!  Panic!  Now what?
Well, it's true that clear wax takes off dark wax!  I brushed on another coat of clear wax and it took off the excess dark wax.

Ahhh, much better!

This piece has awesome dentil molding!

I needed to do something with the hardware.  So, it got a coat of Old White, then I rubbed my wax rag over it to "smudge" the paint with dabs of dark wax.


It's a great home for blue transferware!  How I love blue transferware!

I think it turned out belle!

Pin It

I'm linking up to these great parties this week:

PhotobucketHow to Nest for LessThree Mango Seeds
DelectableHomeHome Stories A2Z
HOGHookingupwithHoHThe 36th AVENUE
PhotobucketThe Shabby NestFurniture Feature Fridays
http://www.findingfabulousblog.com/Decorating InsanityPhotobucket